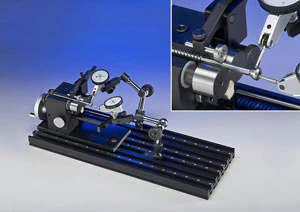
Centrax Runout and Concentricity Inspection System is for verification of cylindrical runout or concentricity in manufacturing or inspection applications. The JCR-1 model incorporates precision datum rolls, a unique upper tension roll assembly, and integral axial stop pins to assure proper part staging and absolute gage accuracy. To accommodate both part specific and universal applications, the unit features an infinitelyadjustable indicator mounting arm with fine-adjustment positioning and a variable CMM Tee-Slot mounting stand. It is equipped with a belt-drive to remove operator influence and simplify operation while increasing gage reliability and repeatability. Typical applications for the Centrax Runout and Concentricity Inspection System include finished and semi-finished fasteners and fittings, screw machine products, and high-precision medical parts.
Additional features include: system accuracy less than 2µm; adjustable from 0.125" through 1"; available with standard Mitutoyo Test Indicators or Digital Test with SPC output; standard adjustable articulated indicator mounting arm; and Tee-slot mounting for infinite positioning options. Also featured are the adjustable axial stops to simplify part positioning and prevent motion during inspection. Easyto- read permanent etched scales on the mounting stand simplify repeat measurement applications. The unit can be used on optical comparators or other measurement systems with optional fixture base. The JCR-1 can be used for adjustable or part-dedicated configurations.
The Johnson Gage Co.
Bloomfield, CT
johnsongage.com

Explore the October 2009 Issue
Check out more from this issue and find your next story to read.
Latest from Today's Medical Developments
- Blueshift’s AeroZero
- November USMTO grow from October
- Platinum Tooling’s custom and special tooling
- Top 5 global robotics trends 2025
- Accumold’s micro molding innovations
- Methods Machine Tools, Multiaxis, announce AI solution investment
- MGS to showcase global expansion and healthcare CDMO expertise
- Medtronic: 5 healthcare tech trends for 2025


