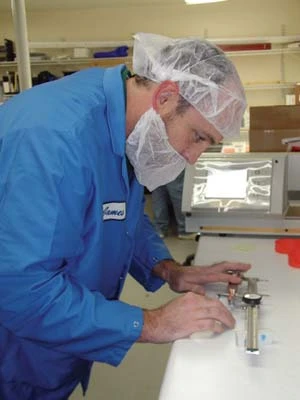
Strict tolerances have to be maintained in any machining process. Along with this comes a need for verification and a precise inspection process. Though almost all applications in the medical industry call for qualitative measurement procedures, recent developments in small parts machining and fabrication processes best highlight this need. Imagine working with wire diameters as small as 0.005 in., meeting tolerances within 0.0001 in., and maintaining angles within 1°. For New England Precision Grinding (NEPG) of Holliston, MA, working with these diameters and tolerances is routine. The company produces micro-ground wire from 304 stainless steel and super-elastic nitinol to meet the precise demands of medical devices. The wire is used for needles and catheter-placed stents so small that their micro-miniature features cannot be seen with the naked eye. Working with wire ranging from 0.003-in to 0.062-in. in diameter, the company developed a proprietary centerless grinding process to meet the extremely tight tolerances required by their customers. To further ensure that the process and the parts being ground were in compliance with the required specifications, NEPG needed precise inspection procedures in place. "Our quality control requires an inspection system that is fast and accurate," says Bill Robinson, Quality Assurance Manager for NEPG. "We found that using Starrett Optical Comparators on the shop floor and in our metrology lab allows us to maintain a high standard based on associated quality. We use a threepan system with each pan containing multiple parts.The operator verifies the first piece on the optical comparator, prior to running the parts. When the first pan is full, the first part going into pan two is checked. However, while the process is running, random checks are made and any variation from tolerance prompts a visual inspection of each part in that pan and the preceding pan on the optical comparator." In fact, the optical comparators are first used on the incoming stainless steel and nitinol. The process calls for inspecting the raw material for any flaws or deficiencies that may be present. From receiving inspection, the raw material goes to the production floor for centerless grinding. Operators utilize seven Starrett Optical Comparators to check their in-process work. In addition, roaming Quality Control Inspectors randomly select pieces and view them on the optical comparators. "We visually check such processes as laser cutting, electro polishing, welding, EDM work, and laser marking," explains Robinson. The optical comparators use 50X or 100X lenses, depending on the size of the micro parts that are in process. For radius checks, overlays are used. And, when a sorting operation is required, a template is used to quickly perform the full inspection. NEPG uses two Starrett HB400 Measuring Projectors in their climate - controlled inspection room with each grinding operation checking its work independently and metrology inspectors checking every dimension and angle on the randomly selected workpieces. While gages, micrometers, slide calipers, and other precision measuring tools may also be used, they are secondary compared to the measuring projectors. NEPG recognizes that while the comparators complete much of the inspection workload, they are also versatile enough to handle intensive and varied inspection work. The HB400's 16-in. screen-diameter provides a wide field of view with cross lines and calibration marks and includes a built-in digital protractor with DD/DMS conversion and Heidenhain's 0.00005 in. resolution scales. The centrally mounted vertical (Y-axis) scale is in-line with the lens and the workpiece for a vertically correct image. While the dual fixturing slots can handle work pieces up to 110-pounds, NEPG's typical part weighs only fractions of an ounce. Dual intensity tungsten halogen bulbs provide sharp profile illumination and twin-bundle, adjustable, on-axis fiber optic surface illumination. NEPG uses 50X? and 100X magnifications in the lab to match the magnifications used on the production floor. The system enlarges part features to ensure the production line is holding its tolerances of ± 0.0001-in. and within ±1° for angles. For NEPG, a full inspection of a part by their metrology lab may involve checking up to eight dimensions, with each inspector typically performing 20 to 30 checks on incoming material, in-process work, and post-production finished goods. "The Starrett Comparators have let us reduce inspection times from 4-1/2 hours to 25 minutes," explains Jim Phillips, lead inspector for NEPG. "We like the way the Starrett system works, especially its ability to handle a wide variety of work sizes." While admitting that there are alternatives for inspection such as computer vision system, Bill Robinson stands by NEPG's decision to use the Starrett optical comparators. "Our optical comparators are the most efficient, fastest and accurate way to inspect parts without the need for complicated setups," states Robinson. Today, NEPG produces an estimated 50,000 micro-ground wire products annually. But it also points out that the path to that success is as difficult as the tests and control measurements to which it subjects its work. All-in-all, NEPG believes it is helping medical OEMs meet the demand for very "small" medical components, thanks in part to the involvement of Starrett and the use of its precision-measuring equipment. The L.S. Starrett Company Athol, MA starrett.com

Explore the September October 2006 Issue
Check out more from this issue and find your next story to read.
Latest from Today's Medical Developments
- Dassault Systèmes enters next phase of Living Heart Project with AI-powered virtual twins
- Bruker’s X4 POSEIDON advanced X-ray microscope
- #53 - Manufacturing Matters - 2024 Leaders in Manufacturing Roundtable
- Festo Incredible Machine celebrates its premiere at the Hannover Messe
- Join us for insights on one of the hottest topics in manufacturing!
- Turnkey robotic systems are already behind the times
- You can still register for March’s Manufacturing Lunch + Learn!
- HERMES AWARD 2025 – Jury nominates three tech innovations


